
From Closet to Mission Control: Building the Galatic Playroom
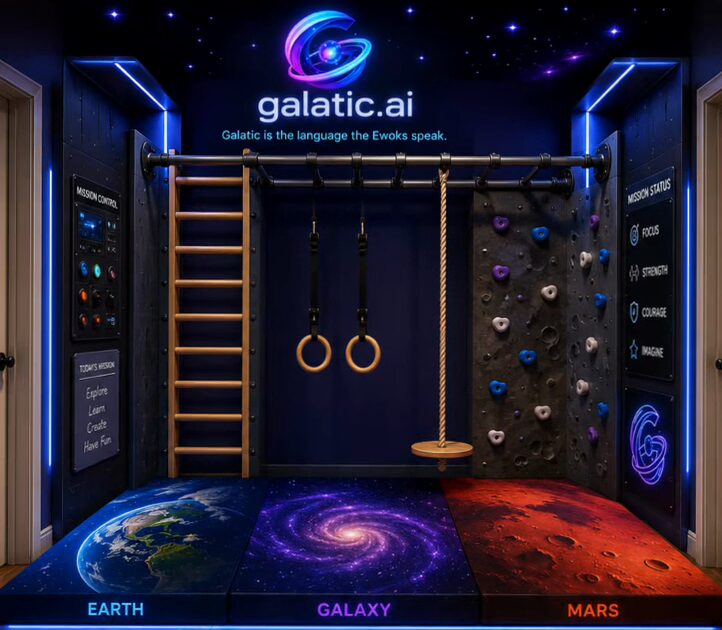
Every build starts with a picture. For this one, the picture was a Galatic.ai concept render of a small room turned into a mission control playroom. It has a Swedish ladder and monkey bars, gym rings and a rope swing, a climbing wall, and a galaxy ceiling of fiber-optic stars and LED strip. The crash mats are printed as Earth, a spiral galaxy, and Mars, and a Mission Control panel of lights and buttons sits on the side wall. The render even has a tagline: "Galatic is the language the Ewoks speak."
The room we actually had was a walk-in space lined with wire closet shelving, a wall holder for tools and craft supplies, and a fold-down arts and crafts table. This post covers how we got from that room to the first piece of the render, filmed as we went.
Part 1: Teardown
The shelving came out first. Each run of wire shelving sat on brackets screwed into the wall, so the job was drill, unscrew, lift, repeat, with the kids keeping me company and keeping the commentary going. I left the screws in the brackets so they would be easier to put back up somewhere else.
The tool and craft holder came down next, and the fold-down craft table is moving out. It's getting a new job as a clean packing and shipping station for Trustmedia365.com orders.
By the end of the day the room was bare walls, with a lot of holes in them.
Part 2: The patch crew
Every screw and anchor left a hole, and every hole needed filling before paint. I didn't have to look far for help. My son and Madeline grabbed putty knives and a lid of spackle and went to work. First there was a round of negotiating over who got which knife, and then real focus: scoop it, press it in, smooth it one direction.
By the time they called it done, the walls were patched, prepped, and ready for paint. That earned a thumbs up.
Part 3: Paint
The walls went from builder white to a dark finish. That gives the room its space feel and sets up the lighting to come. I didn't get the painting on camera this round, but you'll see the result in every shot from here on.
Part 4: Lumber run with Madeline
Madeline came along to pick up the lumber so we could keep going: plywood, and wood to secure the jungle gym to the wall properly. When I asked her what we were buying, her answer was "Wood and another wood." She's not wrong.
Part 5: The wall ladder goes up
Next came the first real piece of the render. A blue and yellow wall ladder with a pull-up bar went into place against the new dark wall. It needed a stronger mount than drywall, so I ran a maple board across the wall and fastened it into the studs, then mounted the ladder to the maple. That spreads the load and keeps the whole frame solid when kids are hanging off the top bar. Next I will clean up the board with the router and sander so the edges are smooth for small hands.
The render's build notes are good rules for anyone doing this at home: anchor every structural piece into studs, round over the edges, check the hardware regularly, and keep an adult around while kids climb.
What's next
The render still has two big pieces left. One is the climbing wall, textured plywood covered in holds. The other is the lighting that makes it Mission Control: fiber-optic stars across the ceiling and LED strip glowing along the edges.
Coming next is the rock wall and Galatic lighting.